Seedy Crackers


Crunch! Everybody loves a good crunchy nibbly. It seems so satisfying and if it’s healthy, it’s all the better. Ever since I can remember I have loved crunchy things~ the toasted crusty bits of any kind of food like celery, only the outside crusty bits of that very rare croissant,  nuts of all kinds…you name it, if it’s crunchy I am drawn to it.  So, instead of avoiding crackers (because I don’t usually eat grains), I can now indulge with these little crunchy bites. 

 I have a hard time keeping these crackers stocked in our house because they are so popular. They take just a few minutes to put together and bake at a lower temperature for nearly an hour.  Make sure to use organic seeds and psyllium husks, when possible, which will make this way better for you. 

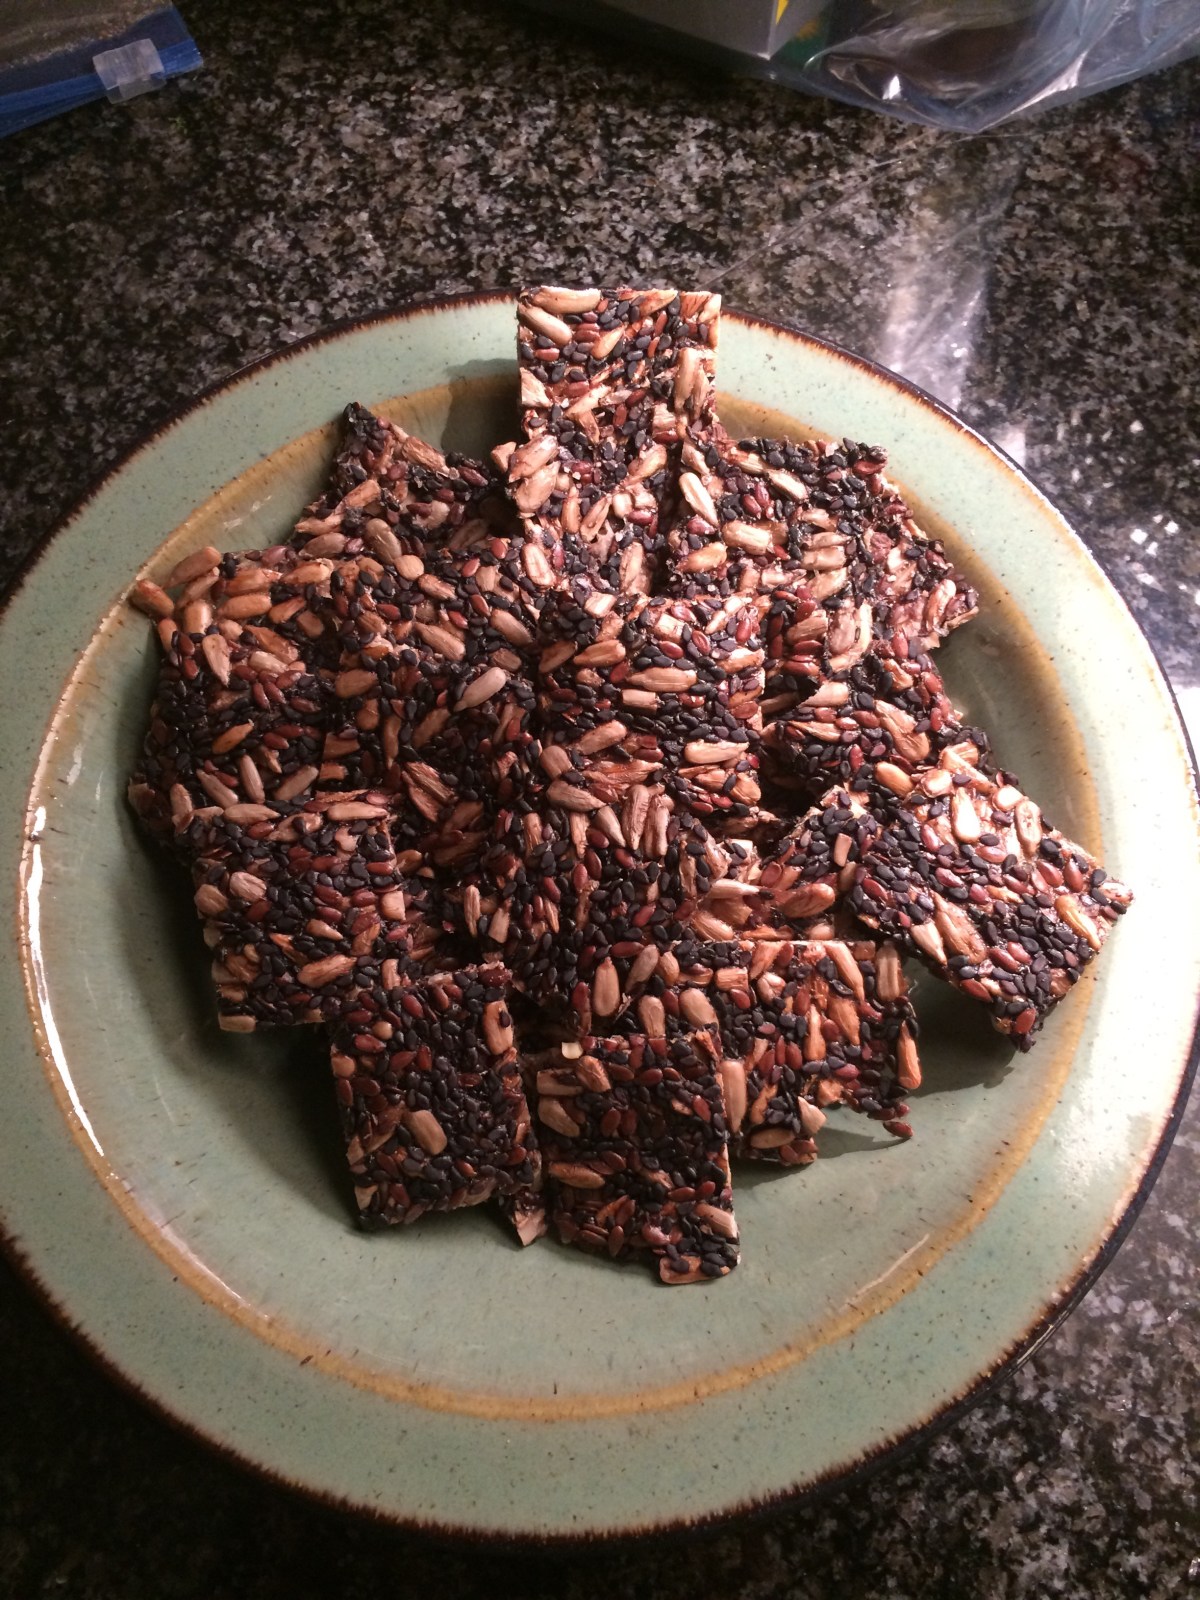
The beauty of making your own crackers is that you can cut them the sizes you want to tailor them to your needs. I often cut them smaller so they last longer around here.

 It is a great snack to eat alone or pare with almond butter, cheese, nut cheese, smashed Avo or use on a cheese meat veggie board. 


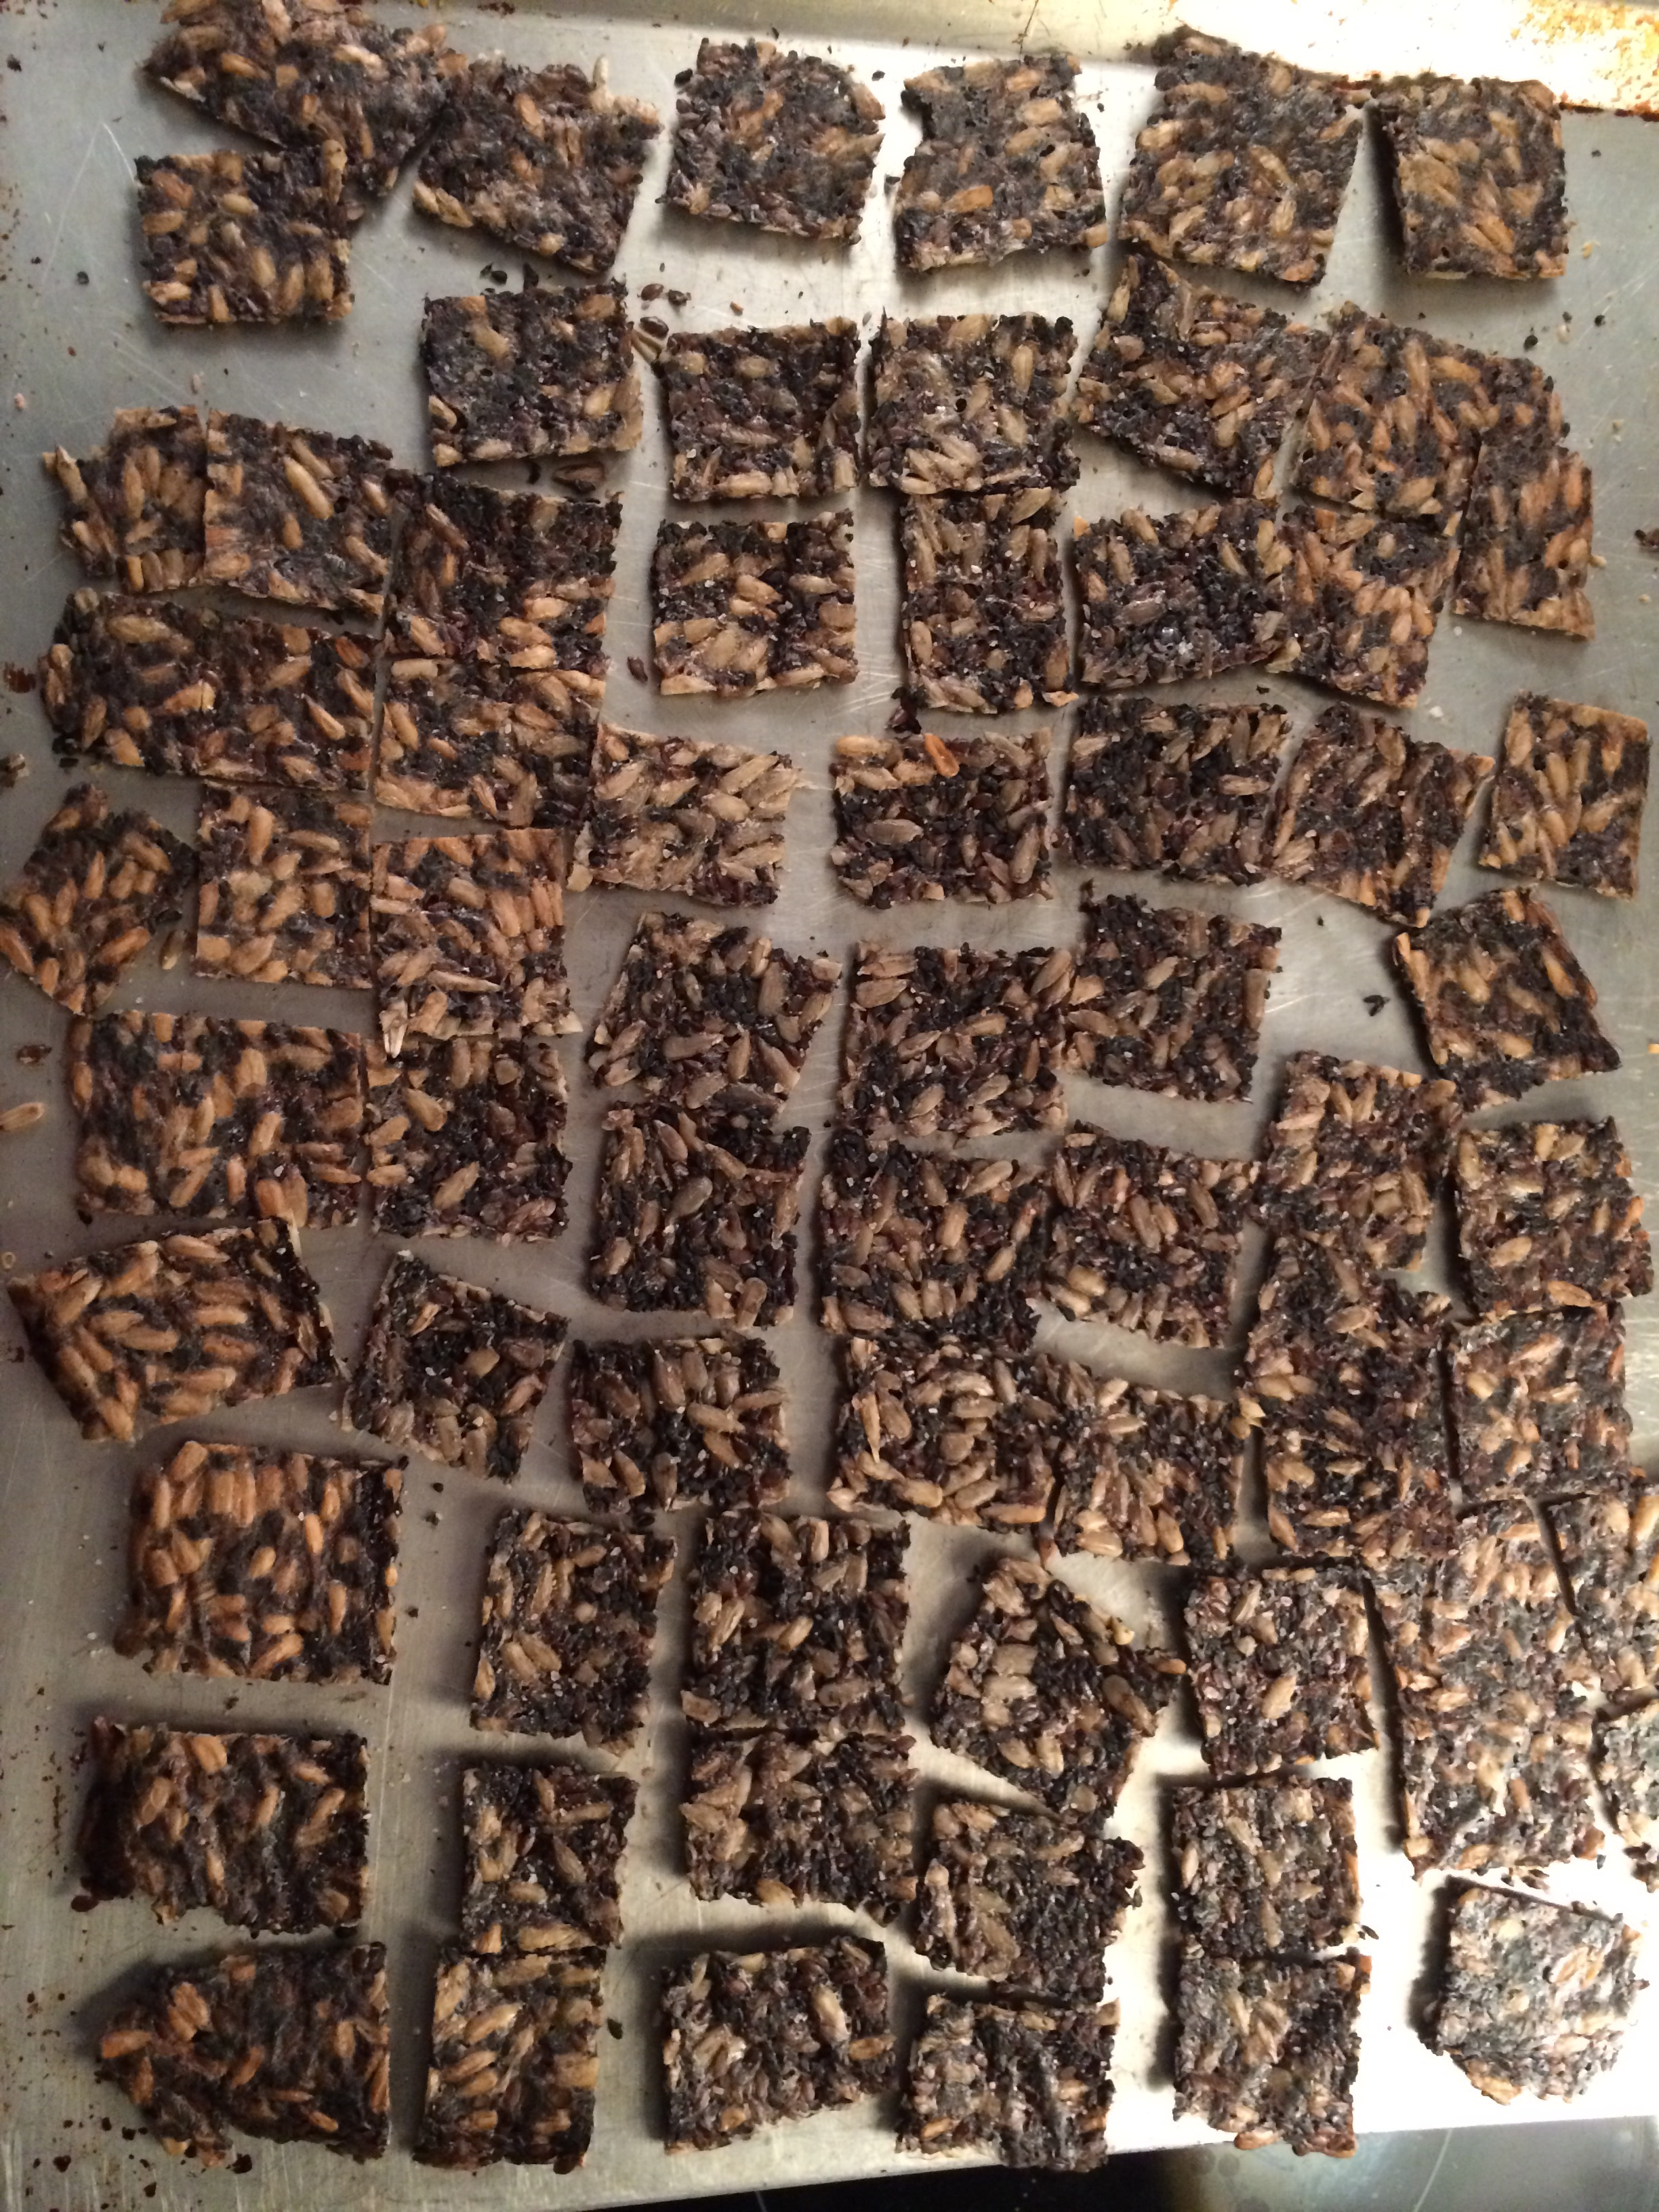
Now bake for 25-30 minutes. Remove and cut into desired sizes. 


Pop back into the oven for 20 minutes. Now flip the crackers over with the baking paper stuck to them and peel off the paper. 


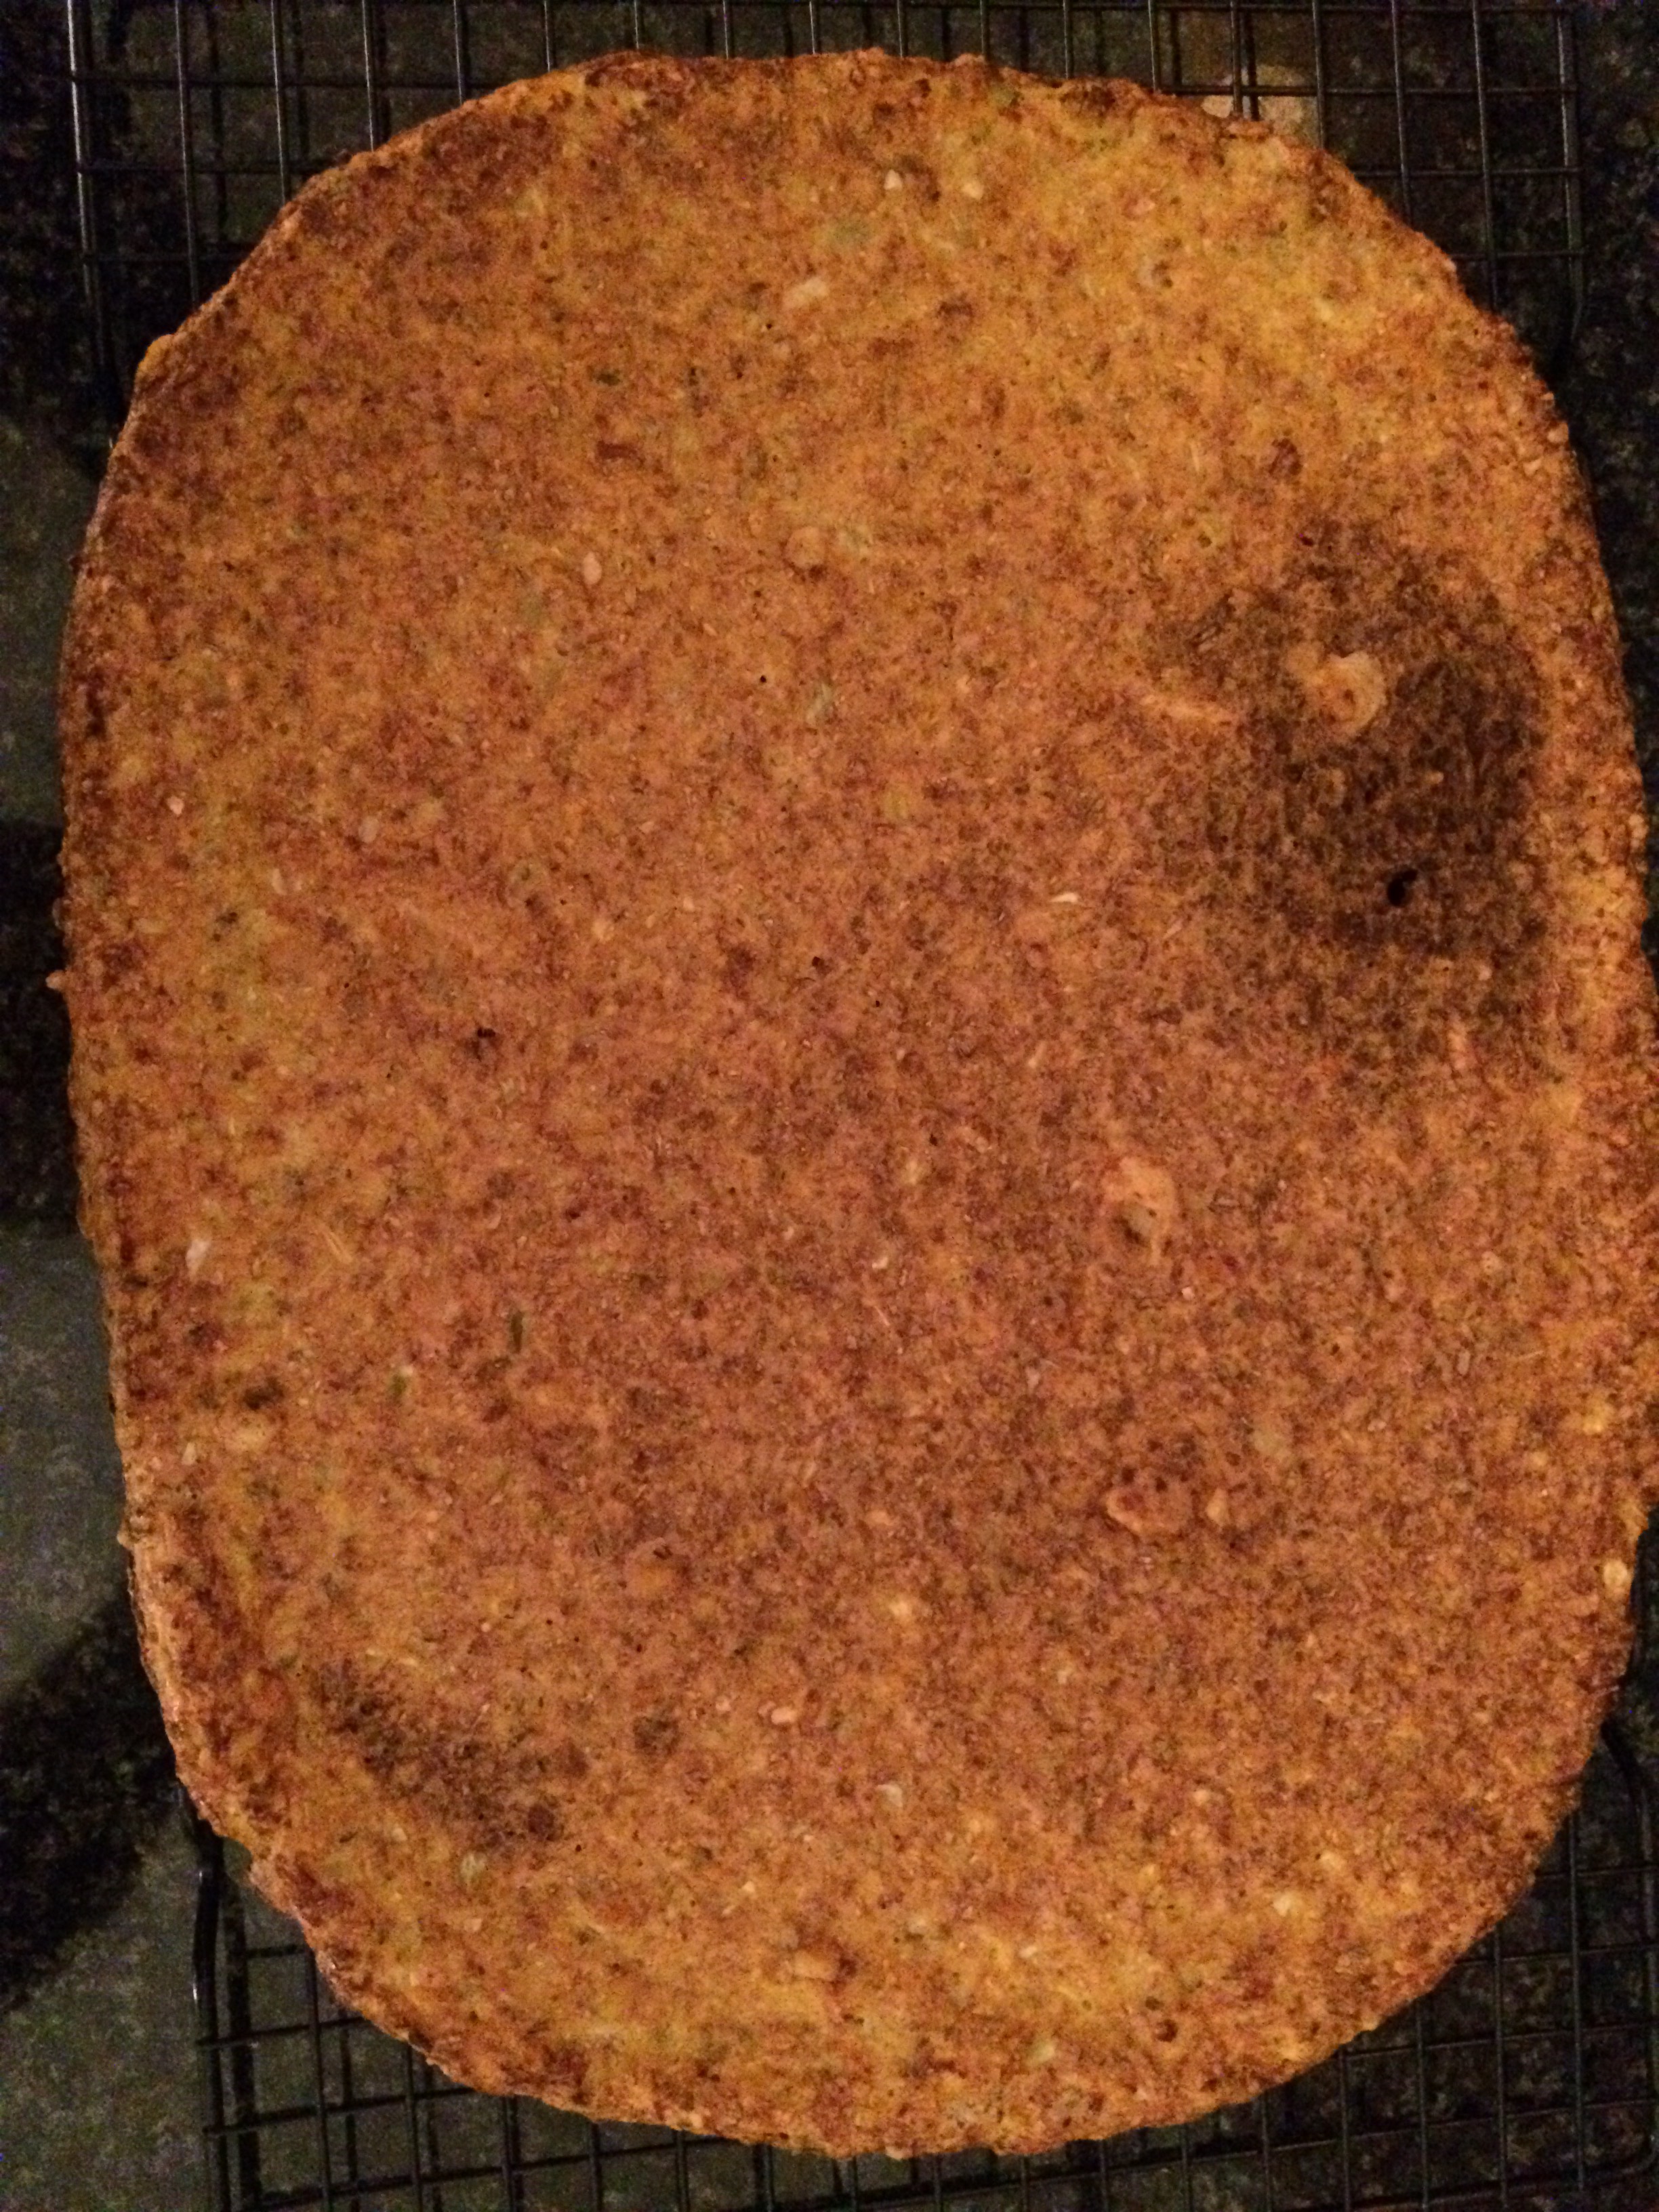
Bake about 5-8 minutes more or until crunchy. I break them apart for more even cooking. Sometimes I just turn off the oven to cool, leaving the crackers to cool and crisp in the oven. 

Seedy Crackers 

1 cup purified water

1 Tbl. Psyllium Husks, slightly mounded

3/4 cup Sunflower Seeds

1/3 cup white or black Sesame Seeds (I used organic black sesame seeds)

3 Tbl. Flax Seeds 

1/2 tsp. Pink Himalayan Salt (plus extra to sprinkle on the top)

Preheat oven to 160C/325F

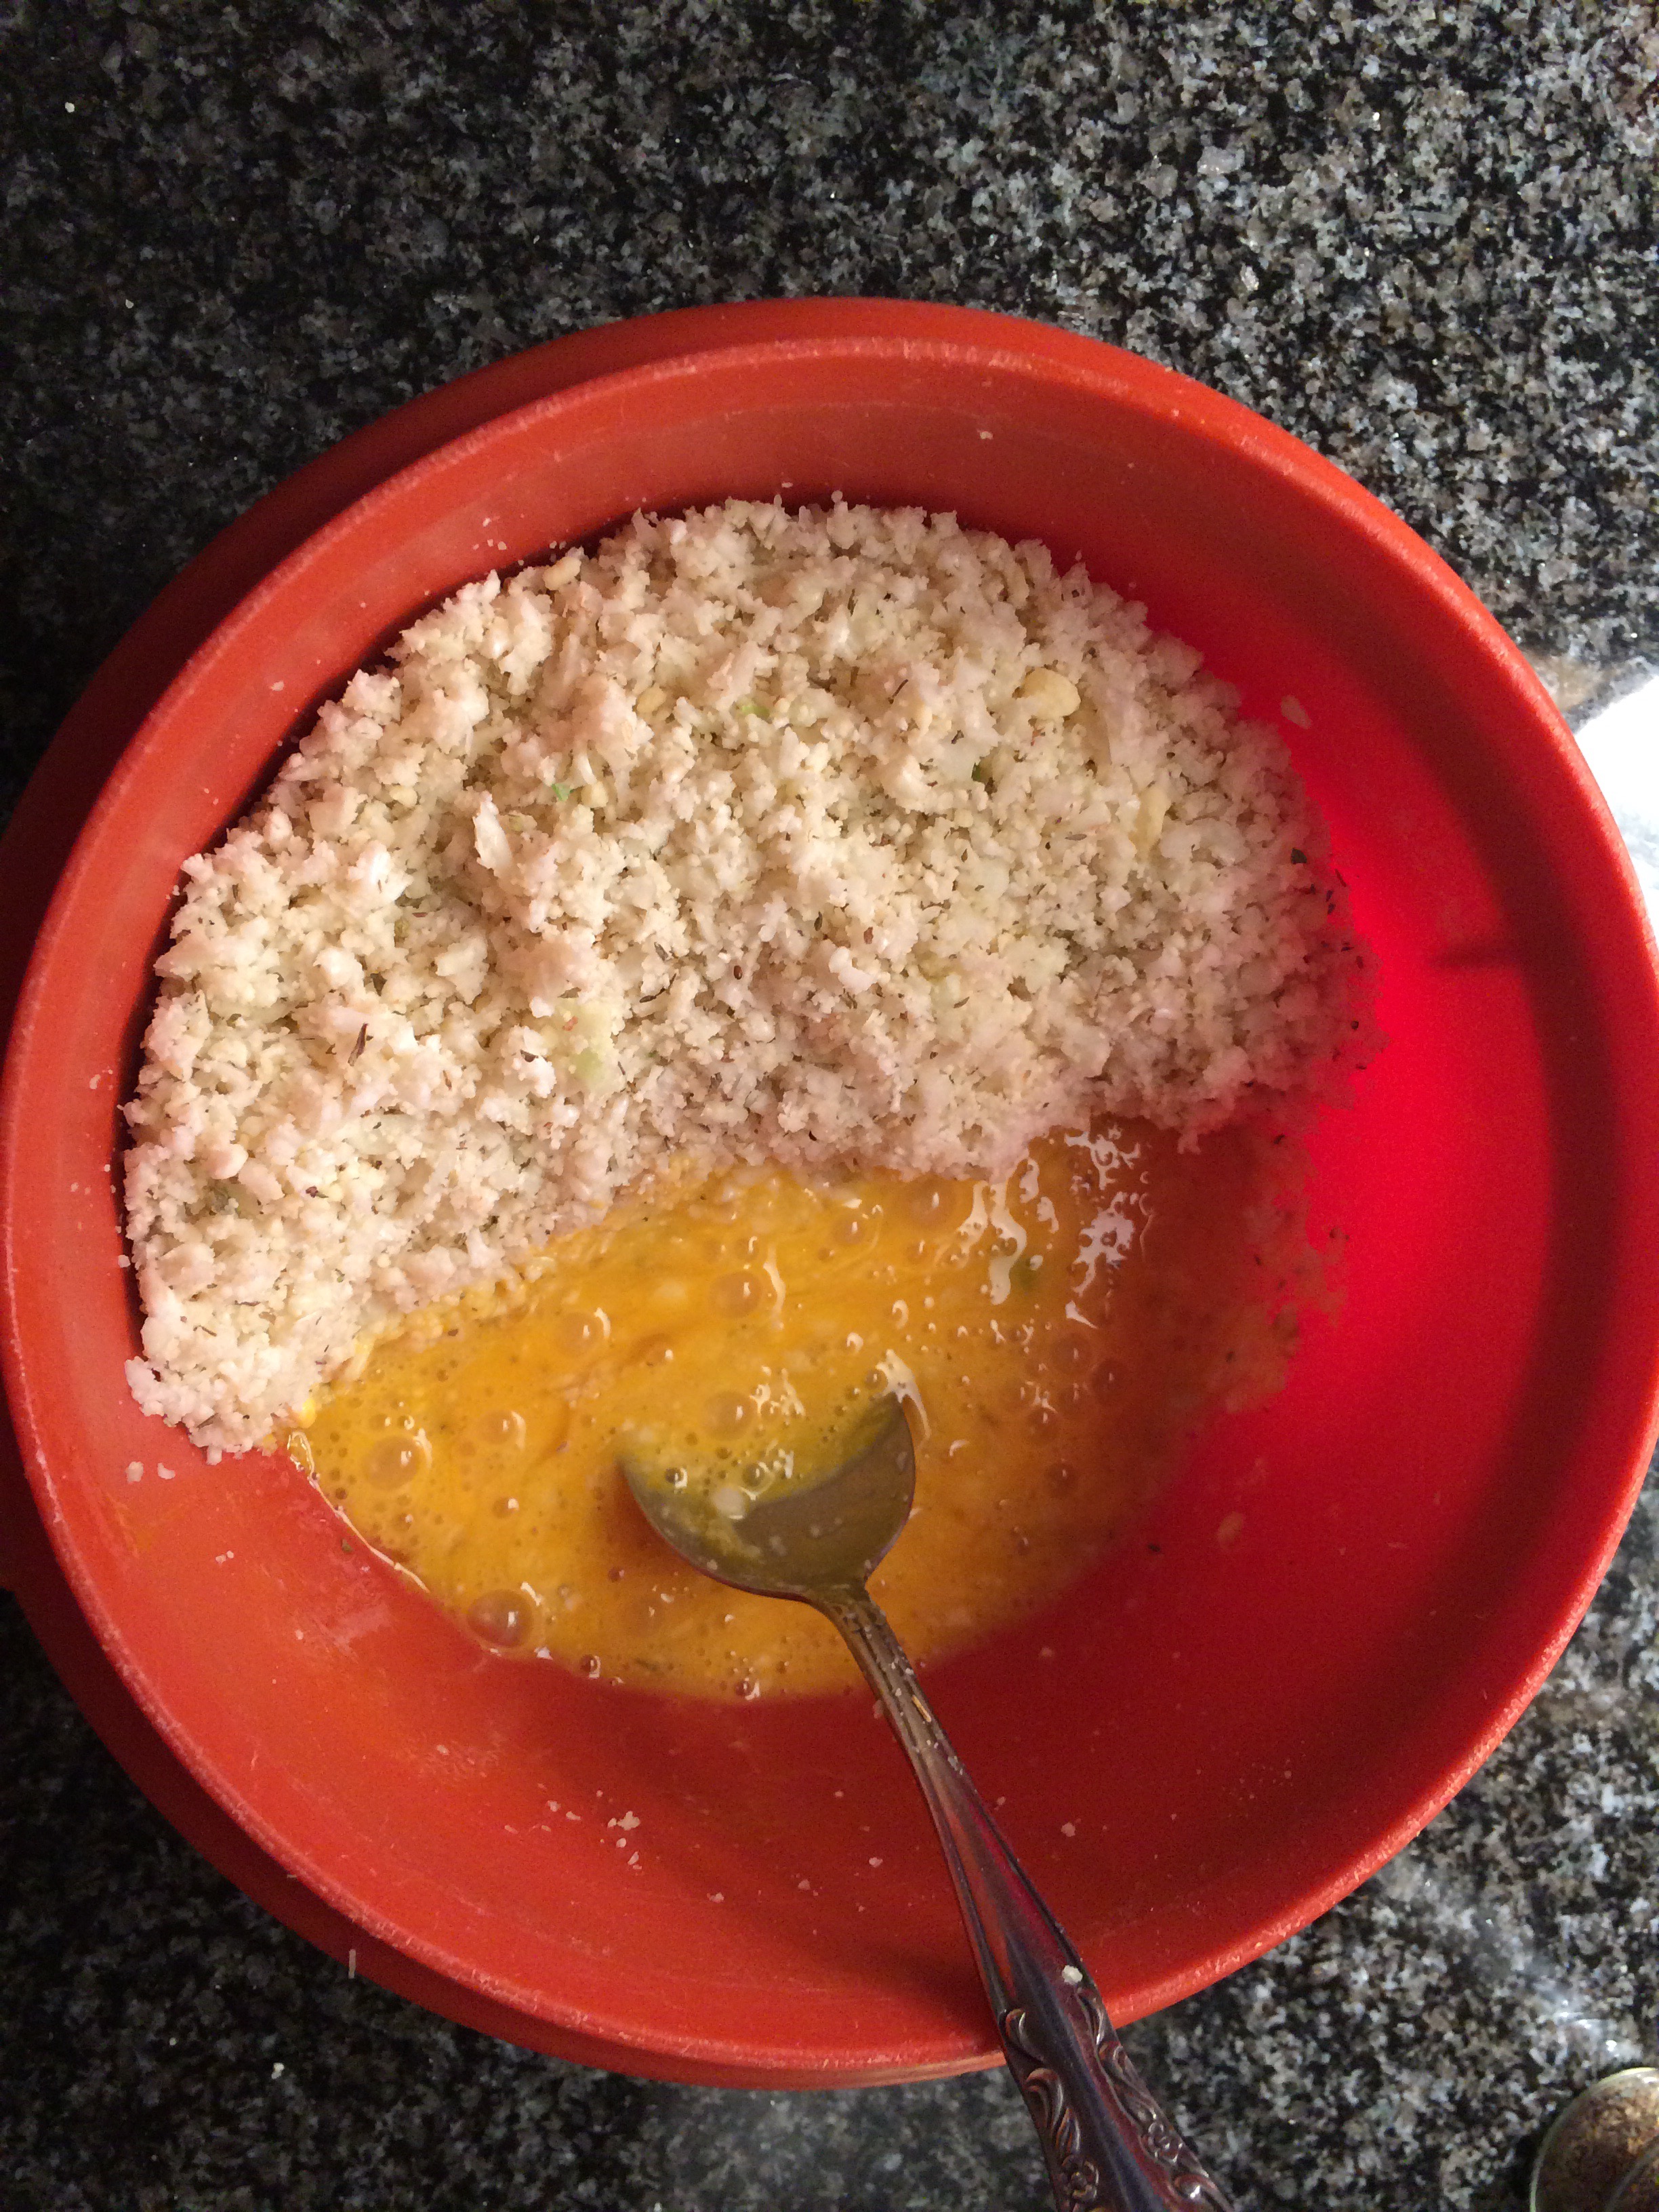
1.  In a mixing bowl or large glass Pyrex measure, add all the ingredients. Stir and let sit for about 15 minutes until the mixture is well thickened. 

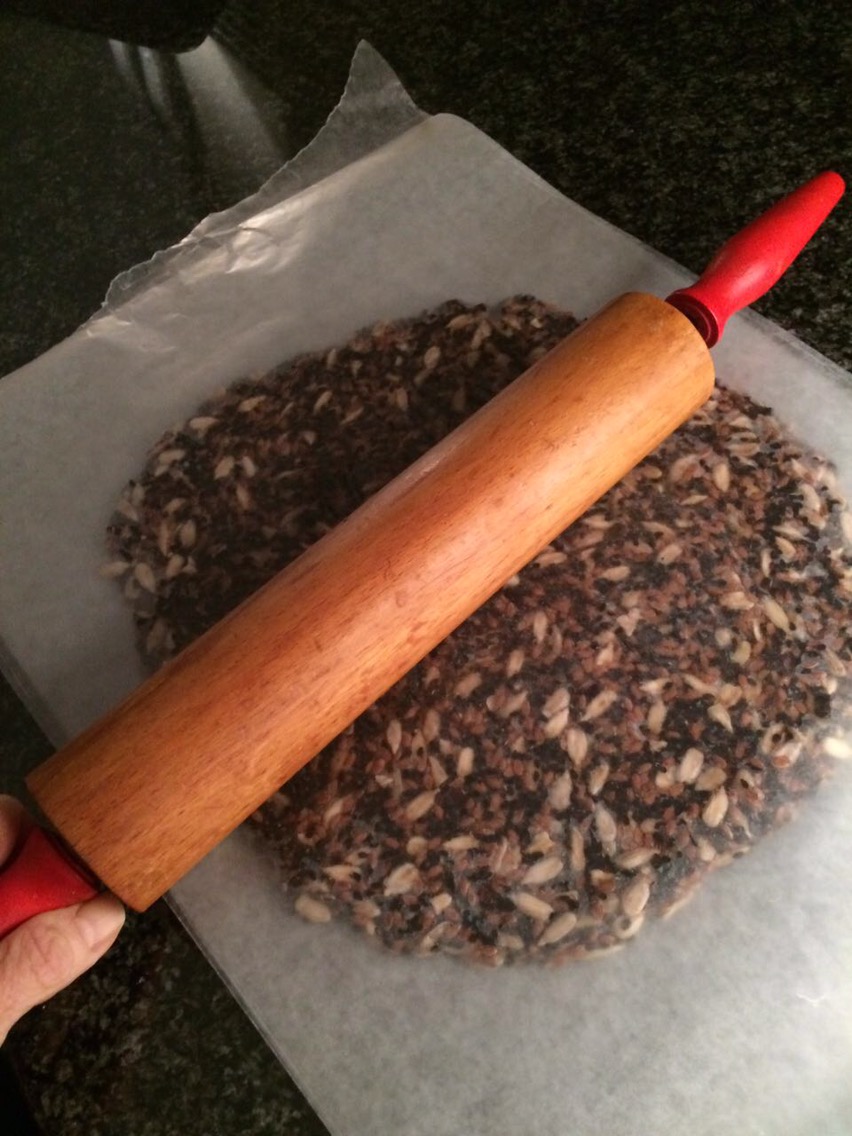
2.  Lay a piece of baking paper on the length of  your cookie sheet. Place the seed mixture on the center of the baking paper and spread it slightly with a spatula or back of a spoon into a rectangle. Top with another piece of baking paper. 

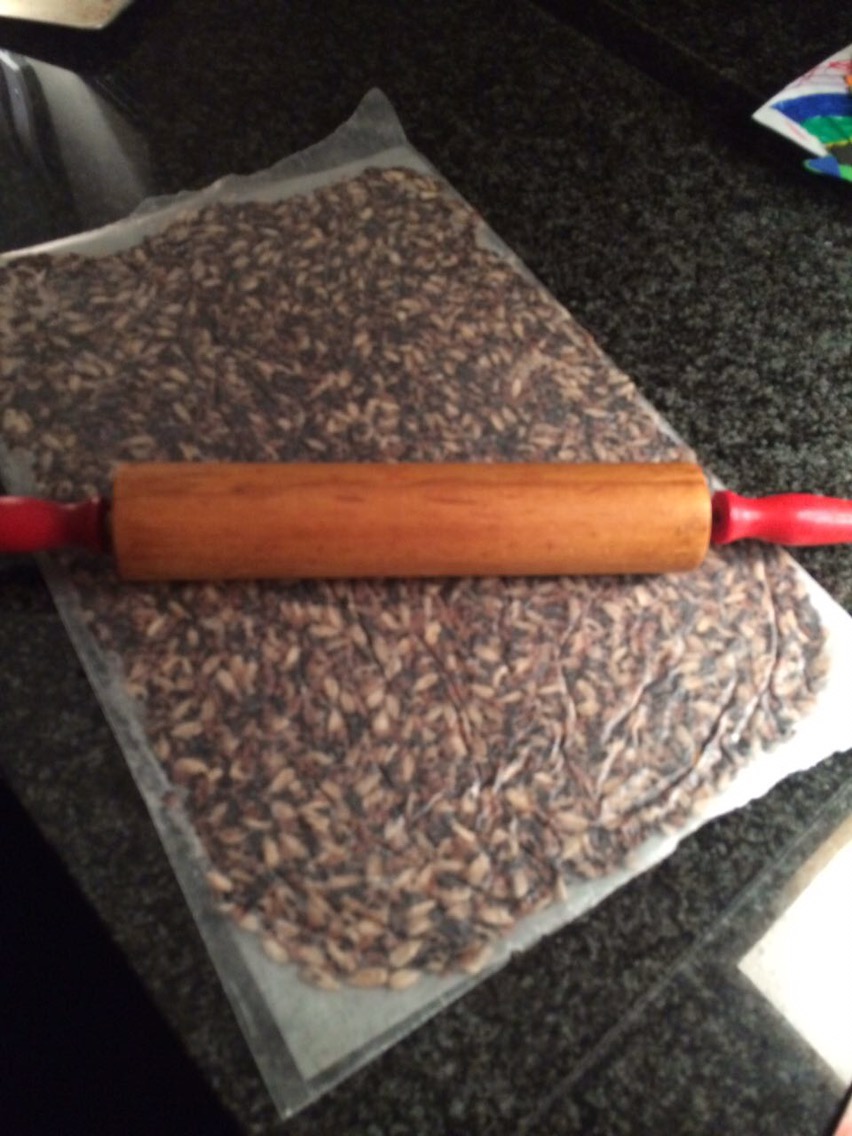
3. Using a rolling pin, roll out the seed cracker mix evenly to the edges of the baking paper. 

4.  Starting at one end, carefully peel back the top parchment baking paper to remove it. 

5.  Sprinkle with a little more salt over the top and then pop it into a 160C/325F oven. 

6.  Bake 25-30 minutes till firm,  but not too crunchy. Remove from oven and cut into desired size & shape using a pizza cutter or knife. Return to oven and bake an another 20 mins. 

7.  Remove from oven and flip the baking paper over with the crackers stuck on it. Gently peel the paper off.  Check to test doneness. If not crunchy return to the oven an additional 5 mins. Cool and store in an airtight plastic bag or container.

Note: I often lower the temperature  of the oven to preserve the integrity of the seeds. If you choose to do that you will just need to bake them longer. The healthiest way to make these would be to use a dehydrator which would keep them raw, but seeing as I do not own one of these I try to bake them at as low of a temp as possible. 


Warmly Yours, Jeanenne  

Foodie Mama

Easy Grain-Free Scones

I’m back with another scone recipe! This time it’s the promised low carb grain-free version. You can have the pleasure of eating scones,  but without the health issues that grains cause in some people and they are lower in carbs.

For me, I’m so thankful to have a healthy alternative that I can enjoy with a cup of delicious green tea. Delicious you say? I know, most of you are wrinkling your noses up and your taste buds are curling backwards at just the thought of actually having green tea on purpose. Who, you might ask, would enjoy a steamy cup of green tea? That, would be me:) along with a host of other green tea lovers. Here’s juat a few tidbits on this tea to consider. Green tea is alkalizing for your body, it has antioxidants to reduce the forming of free radicals and protects cells.  It also can improve brain function through the amino acid L-theanine which is calming.  Some studies show that green tea may lower your risk for breast, prostate and colon cancer.

I admit that when my naturopath, who was helping me through mercury poisoning, strongly suggested I switch to this tea, I was NOT excited. At. All.  It was one of those things that I asked God to help me like because I sure didn’t like it. It tasted like spinach water. I learned that brewing it more than 4 minutes makes it taste bitter and to use water not quite at a boil. Well,  it became my favorite thing and I love it!  It is so comforting to have my green tea with me everywhere I go. And I mean everywhere. Just ask my family and close friends. There is more on green tea benefits here.

Now let’s get back to the scones since green tea is struggling to be the star of this post…

Okay…these scones are tender and filling. Their texture is more dense because of the coconut/ almond flour combo. The scone will not have a crusty outside like ones made with the other flours, but are more cake-like.  They’re the perfect accompaniment to a cup of Joe…or perhaps some green tea.


Easy Grain-Free Scones

1/4 cup Coconut flour, packed and slightly mounded

2 Tbl. Almond flour,  packed

1/2 tsp. Cinnamon

1/8 tsp. Baking soda

1/8 tsp. Himalayan pink salt

Optional Add-ins:  2 Tbl. of any of the following: mini dark chocolate chips, dried cranberries, chopped nuts, cinnamon chips

3 Eggs room temperature

1/4 cup Coconut oil or grass-fed Butter, melted

1 Tbl. raw Honey

1/2 tsp. Vanilla extract

Note: 1 Tbl. Milk, coconut milk or choice of milk- only if needed for too a stiff batter (I did not need it in these scones)

  • Preheat oven to 180C/ 350F. Put baking paper on a cookie sheet or small tray.
  • In a medium bowl mix dry ingredients together with a spoon. Add any of optional items here.
  • In another small bowl combine coconut oil, honey and vanilla extract.
  • Add eggs to oil mixture and mix with a fork or whisk until well blended.
  • Pour the wet ingredients into the dry and combine well. Let sit for a few minutes so that the flours can soak up the moisture.  If the dough becomes too stiff add the milk. Otherwise omit it.
  • Using an ice cream scoop, large spoon or 1/4 measuring cup, scoop up a scant 1/4 cup of the dough and drop it on the baking paper lined pan. It should make 5-6 scones.
  • Bake about 13 minutes till lightly browned. Do not overbake for they will become dry.

May serve with butter, whipped coconut cream or as is.  Now, go grab a cup of green tea. Oh, all right, get your coffee, black tea or comfort drink and enjoy these little guilt-free morsels.

Note: If you have left over scones you can slice them 1/4 inch thick and bake 180C/350F to dry them out and use as biscotti.


Warmly yours,  Jeanenne 

Foodie Mama


Chocolate Protein Balls


Chocolate Protein Balls are quick to make and a yummy afternoon snack  or after dinner treat. I first made something like this when my friend, Gail sent a package to me here in South Africa several years ago. I was so excited to receive a package from home that I didn’t really care what was in it! Upon opening it, I discovered a recipe and all that  I needed to make Nut & Date Protein balls. I was delighted! She really sent me such a thoughtful gift. Thank you Gail!  After making these a few times,  I decided to develop my own recipe that was lower in carbs and higher in healthy fats. I must say these little treats can be quite addicting.  Yummers!


Chocolate Protein Balls

1/2 cup Walnuts

1/4 cup Sunflower seeds, raw

2 Tbl. Vanilla protein powder, slightly mounded

3 Tbl. raw Cacao or cocoa powder

2 Dates pitted, fresh or dried

1 1/2 Tbl. Coconut oil

3-4 tsp water

Flaked coconut to roll balls in

Place walnuts, Sunflower seeds, protein powder and cacao powder in a small food processor or power blender like a vita mix. Process until crumbly. Add dates, cut in fourths, and coconut oil. Process again to breakup and incorporate oil and dates. Next,  add water starting with 2 tsp and blending. Check mixture to see if it will hold together by smashing tablespoon amount into a ball with your hands. If it still seems too dry add another tsp of water. Roll into 12-14 balls. Then, if desired, roll balls in unsweetened coconut flakes pressing to adhere. Place in a covered container and refrigerate till firm. Store in fridge.

Tip: I’ve used AIM Vanilla Pea Protein powder and Genuine Health Fermented Vegan Protein in vanilla. Another good option is Wazoogles Vanilla Sky Superfoods Protein Shake or Arbonne Protein Shake in vanilla. 

I like mine without coconut, but My Man likes it with the coconut. You could also coat them with crushed nuts.

Happy Snacking!

Warmly,

Jeanenne ~Foodie Mama

Spinach Cauliflower Pizza 

Spinach Cauliflower Pizza

img_0377

Spinach Cauliflower Pizza is a favorite of ours. We eat mostly grain free and with pizza being my favorite Sunday night meal, I was determined to find an alternative.  One thing I didn’t want to do was spend every Sunday afternoon prepping dinner, so I’ve shortened the process from other cauliflower crust recipes. The whole steaming of the cauliflower and wringing it with a tea towel was not for me. I eliminated that whole mess of a process pronto, as you will see in the recipe. If you have a pizza stone you will get even crispier crust results.  Topping the pizza with large leaf spinach or Swiss chard sauté (recipe below) makes it a wonderfully healthy and flavorful.  You are invited to have your own traditional pizza night, like we do,  with this cauliflower pizza and feel great after eating it!


Cauliflower Pizza Crust

  • 3 cups riced cauliflower
  • 1/3 cup fresh parmesan cheese
  • 1/3 cup almond flour
  • 1 tsp. basil
  • 1 tsp. oregano
  • 1/2 tsp. red pepper flakes (opt.)
  • 1/2 tsp. pink salt
  • 2 eggs

Preheat oven to 200 C/400 F.  Place pizza stone in the oven while preheating.  To rice cauliflower- place cauliflower florets into a food processor and whir till it is rice size pieces of cauliflower.  Measure 3 cups into a medium size bowl.  Add parmesan, almond flour, basil, oregano, red pepper flakes and salt.  Mix well with a spoon.  Add the eggs to the side of the bowl and stir to break up eggs and then mix into the rest of riced cauliflower mixture.  Lay a piece of parchment paper on a flat-sided large cookie sheet.  Pour Cauli mixture onto the paper.  Spread a little with a spoon, then pat out the “dough” with your hands, shaping it into a large oval pizza crust.  This will not be like dough at all, since it has no flour in it.  Try to make the crust base fairly thin. You don’t want it thick or it won’t get crisp like. Form a little crust around the edge.  Make sure that this will fit onto the stone that is in the oven.  When you are finished shaping your crust place it in the oven on your cookie sheet, but if you have a stone~ you will slide the parchment paper with the crust onto the pizza stone in the oven to bake.  Bake for 25-30 minute until nicely browned.  Now slip the crust onto the cookie sheet and flip it over. Remove the parchment paper and slip the crust back into the pizza stone in the oven for a 5-6 minutes to brown up the bottom.  (If not using a stone,  just remove the crust on the cookie sheet from the oven, turn it over and peel off the parchment paper and place it back into the oven to brown up the underside of the pizza for 5-6 mins.) Watch it carefully so it doesn’t burn.  Next, remove it from the oven and slide it onto a cooling rack to cool crust before topping it.

Spinach & Toppings 

  • 2 tsp. oil
  • 6-8 cups large leaf spinach or swiss chard, chopped
  • pink salt to taste
  • red pepper flakes, opt.
  • 4 cloves garlic, crushed
  • 1/2 Tbl. olive oil
  • 1-2 cups shredded cheddar or mozzarella cheese
  • 2-3 Tbl. tomato paste
  • oregano
  • 6 baby tomatoes (cut each into 4ths and roast while crust is baking)

While pizza crust is baking, oil large skillet with 2 tsp. oil.  Over medium low heat, place spinach or swiss chard (my favorite) in the skillet.  Season with a little pink salt and red pepper flakes and cover.  Check frequently  and flip the spinach over until softened.  Try not to let the moisture on the lid into the spinach.  You don’t want it too wet.  Shred cheese.

To Assemble:

Place cooled pizza crust onto your cookie sheet.  Drizzle olive oil on crust.  Spread with fingers around crust.  This will prevent the crust from getting soggy.  Top with tomato paste, spreading thinly to near edge, leaving a crust.  Sprinkle with oregano.  Next top with the swiss chard or spinach.  Using a garlic press, crush garlic over the spinach.  Top with the desired amount of cheese.

Push topped pizza off of the cookie sheet onto the pizza stone that is still in the oven, or just simply place the crust on the cookie sheet in the oven.  Cook until the cheese is melted.  Remove, cool slightly and cut into 12 slices.

I hope you have as much fun munching away on pizza as we do on Sunday nights:)

Foodie Mama

Veggie Eggplant Lasagna

Veggie Eggplant Lasagna

I made this lasagna while my niece Sophia was visiting me here in South Africa.  It was a really fun bonding experience being able to cook together.  After making it we shared this flavorful dish with my husband Terry and friends.  It was a hit!  This is on my keeper list of  recipes that I make often.  You can also make this ahead and cook it the next day.

Vegetable Noodles

  • 2 large eggplant, peeled & sliced longwise into 1/4 inch slices
  • salt and pepper
  • baking paper

Ricotta Mixture

  • 2 cups ricotta cheese (my homemade ricotta here)
  • 2 eggs
  • 3 spring (green) onions, chopped
  • 3 cups mozzarella cheese, shredded
  • 1/2 cup fresh parmesan, shredded

Veggie Sauce

  • 2 onions, chopped
  • 2-3 carrots, chopped
  • 3 cloves garlic, crushed
  • 4-5 medium zucchini, sliced and halved
  • 1 red bell pepper, chopped
  • any leftover eggplant, chopped
  • 1/2 Tbl. oregano
  • 1/2 Tbl. basil
  • 1/2 Tbl. thyme
  • 1/2-1 tsp. red pepper flakes
  • 300 grams/ 10 oz. frozen, chopped spinach
  • 1 cup dry red wine
  • 350 ml./ 12 oz. tomato sauce
  • 1 can (390 gm.) diced tomatoes
  • salt & pepper
  • 2 Tbl. oil (I use macadamia nut oil because it can endure high heat)

Preheat oven to 220 degrees C/ 425 degrees F.  Line cookie sheet with baking paper and lay out eggplant slices side by side. You may need 2 trays.  Season with salt and pepper.  Bake 5 minutes then flip each slice over and bake 5 more mins. Remove from oven and set aside.  Lower oven to 190 C/ 375F.

To make cheese mixture:  blend ricotta, egg and  green (spring) onions.

For veggie sauce:  saute onion and carrots in the 2 Tbl. oil until it begins to soften.  Add garlic, zucchini, red bell pepper and leftover eggplant, if any. Cook about 5 minutes till softened.  Add spinach, tomatoes, spices and wine.  Simmer uncovered for about 15-20 minutes until all the vegetables are soft and sauce has reduced a bit.  Season with salt and pepper.

To Assemble: 1-Spread 1/3 of veggie sauce in bottom of 9″ x 13″ glass or stone pan.      2-Layer  1/2 eggplant slices, 1/2 ricotta mixture, 1/3 mozzarella and parmesan.                  3-Repeat layers. 4-Add the last layer of sauce, then top with mozzarella and parmesan.   Spray some foil with cooking oil spray and cover dish with foil, oiled sided down.  Bake at 190C/375F for 1 hour.  Remove foil and bake 10-15 mins more to slightly toast cheese. Let sit for about 10 mins before cutting into squares to serve.

Yummers!

Foodie Mama


Easy Homemade Ricotta Cheese

Easy Homemade Ricotta Cheese

Many people don’t realize how simple making ricotta can be.  I have never purchased store bought ricotta again after I discovered how to make my own ricotta.  My family enjoys the dishes I make using this easy recipe.  Some examples include: Veggie Eggplant Lasagna and as a Pizza topping.  I use all organic grass-fed milk and cream to keep it healthy.

Ingredients:

  • 2 Liters organic grass-fed full cream milk
  • 1 cup organic cream
  • 1/2 tsp. salt
  • 2 lemons squeezed to equal 1/4 cup juice
  • large strainer lined with cheese cloth

In a large sauce pan place milk, cream and salt. Attach a thermometer to the side of your pan to keep an eye on the temperature. Heat over medium heat, stirring constantly.  When the thermometer reaches 85C/185F.  Add the lemon juice and stir. Do not allow the mixture to boil.  Lower heat while stirring until you see curds forming and the whey separating. Remove from heat and let it cool for about 15 minutes.

Place your prepared strainer lined with cheese cloth over a large bowl.  Slowly pour the cheese into the strainer.  Let it sit for 15-30 minutes.  The longer you drain it,  the dryer it will become.  You could drain it for up to an hour if you want more firm cheese.  Move the ricotta into a glass container with a lid to store in the refrigerator, It will firm up even more after it cools.  You can use your cheese immediately or store for later.

Yummers!

Foodie Mama


%d bloggers like this: